Society Night 2020/03/12

[et_pb_section fb_built="1" _builder_version="4.4.0" global_colors_info="{}"][et_pb_row _builder_version="4.4.0" global_colors_info="{}"][et_pb_column type="4_4" _builder_version="4.4.0" global_colors_info="{}"][et_pb_text _builder_version="4.14.7" hover_enabled="0" global_colors_info="{}" sticky_enabled="0"]

We were treated to 3 presentations at the recent society night. 

Building Dobsonians - By Steve Floodgate & Dave Grist

Modifications to the EQ6 Mount - By Simon Dawes

ExoClock update - By Martin Crow

Thanks to all those who contributed

[/et_pb_text][/et_pb_column][/et_pb_row][/et_pb_section]

EQ6 Locking Power Mod

[et_pb_section fb_built="1" _builder_version="4.4.0"][et_pb_row column_structure="1_2,1_2" _builder_version="4.4.0"][et_pb_column type="1_2" _builder_version="4.4.0"][et_pb_text _builder_version="4.4.0" hover_enabled="0"]

The EQ6 is known for its power connector coming out or momentarily disconnecting, which is not something you want happening in the middle of an imaging session. I'd previously replaced all my power connectors to a type with a locking collar and decided to mod my EQ6 so that all my gear uses the same connector. This is not a particularly hard mod if you are confident around electronics and a soldering iron, but it will obviously void your warranty. You have to choose where to fit the connector carefully to avoid any components on the motherboard. Tapping onto the 12v on the board is pretty easy but worth checking with a multi-meter.

[/et_pb_text][/et_pb_column][et_pb_column type="1_2" _builder_version="4.4.0"][et_pb_text _builder_version="4.4.0" hover_enabled="0"]

EQ6-locking-powwr-mod

[/et_pb_text][/et_pb_column][/et_pb_row][/et_pb_section]

Super Smooth EQ6 Altitude Adjustment Mod

[et_pb_section fb_built="1" _builder_version="4.4.0"][et_pb_row _builder_version="4.4.0"][et_pb_column _builder_version="4.4.0" type="4_4"][et_pb_text _builder_version="4.4.0" hover_enabled="0"]

The EQ6 is difficult to polar align in Altitude, especially when fully loaded, the Knobs Mod can help, but only so far because the design of the altitude adjustment is flawed. Modern Astronomy  make a 'rail mod' this corrects the design and makes precise polar alignment in altitude really smooth. I won't go into the installation here, but it is straightforward, the altitude bearing/bolt covers are liekly to be damaged when you remove them (I got mine off ok but this is apparently unusual) so the kit does come with some nice metal new ones (although I prefer the originals).

Concept


[/et_pb_text][et_pb_text _builder_version="4.4.0" hover_enabled="0"]

EQ6-slide-mod-concept

[/et_pb_text][et_pb_text _builder_version="4.4.0" hover_enabled="0"]

Getting the altitude bearing bolt covers off is the hardest part of this mod, you will likely destroy them, fortunately the kit from Modern Astronomy comes with some new ones.

EQ6-Altitude-slide-mod

[/et_pb_text][/et_pb_column][/et_pb_row][/et_pb_section]

Super Smooth EQ6 Azimuth Adjustment

[et_pb_section fb_built="1" _builder_version="4.4.0"][et_pb_row _builder_version="4.4.0"][et_pb_column type="4_4" _builder_version="4.4.0"][et_pb_text _builder_version="4.4.0"]

The Eq6 is fixed to the pier/tripod using a central bolt, but this generates significant friction between the tripod/pier and EQ6 which can make polar alignment along the azimuth axis difficult, you need the central bolt to be tight to ensure no movement but loose to adjust the azimuth for polar alignment, but it can't be both, fortunately this can be easily fixed.

If you haven't done it already complete the knobs mod.

Parts:

Instructions:

I used 1mm thick PTFE sheet, but I know others who have had success with thinner PTFE sheet, you can cut this using sturdy scissors, but I opted to scribe the PTFE using a pair of engineering dividers. Simply place the sheet between the mount and the pier adapter/tripod.

Note image below doesn't show the hole you have to cut for the lug that protrudes from the pier/tripod which the  azimuth adjustment bolts push against.

[/et_pb_text][et_pb_text admin_label="Image" _builder_version="4.4.0"]

[caption id="" align="aligncenter" width="800"]EQ6SupersmoothAltitudeMod 
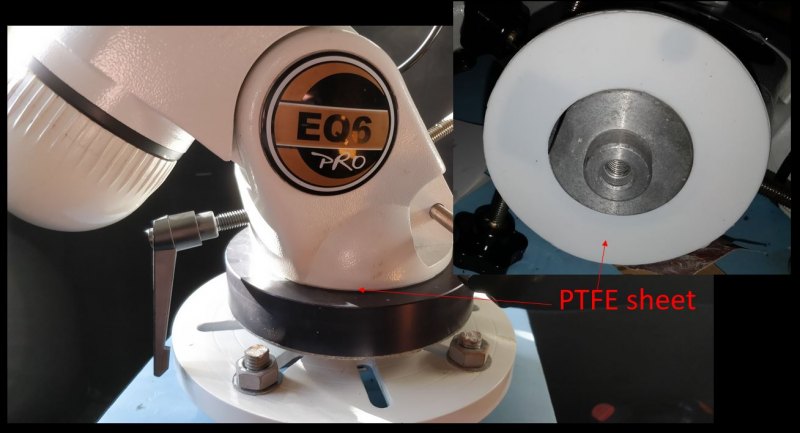
PTFE between the pier mount and the EQ6 make for super smooth azimuth adjustment when polar aligning the mount[/caption]

[/et_pb_text][/et_pb_column][/et_pb_row][/et_pb_section]

SkyWatcher EQ6 Knobs Mod

[et_pb_section fb_built="1" _builder_version="4.4.0"][et_pb_row _builder_version="4.4.0"][et_pb_column type="4_4" _builder_version="4.4.0"][et_pb_text _builder_version="4.4.0" hover_enabled="0"]

The polar adjustment knobs on the EQ6 are not very good, upgrading these parts will make your telescope mount much easier to use and therefore will result in better polar alignment leading to better images. 

The problems:

  • The Azimuth adjustment knobs are too small to get a good grip on them
  • The Azimuth adjustment knobs are too close to the mount, so you either bang your knuckles into the mount or can't get a propper grip on the knobs.
  • The Altitude adjustment bolts are too soft and bend easily
  • The handles on the Altitude adjustment bolts are too small and uncomfortable to handle.

The Solution:

Fortunately these problems can be fixed relatively easily by replacing the parts.

Parts list:

Tips:

This is a straightforward modification, but there are a few things to consider.

  1. When removing the altitude adjustment bolts remove the telescope and counter weights, also be careful that the mount doesn't swing down - the mount is heavier that you think so this job is best done on a workbench with the mount laying on its side.
  2. If you can't remove the rear (south facing) altitude adjustment bolt - don't force it, you will damage the thread -  it is probably bent! this is a common problem with the EQ6. Unfortunately fixing it, although straight forward, does require removing the circular caps and unbolting the the central altitude bearing bolt and almost everyone who tries this damages the end caps covering the altitude bearing bolt. These caps are glued in place with what looks like epoxy. I was lucky and the paint the expoy was glued to gave way but it is very unusual for these to not be destroyed in the process of removing them (if you do destroy them you can get replacements from Modern Astronomy as part of their slide mod). 

[/et_pb_text][et_pb_text admin_label="Image" _builder_version="4.4.0"]

EQ6knobsMOd

Replacement Knobs for the EQ6 make a huge difference to polar alignment

[/et_pb_text][et_pb_text admin_label="Bent Alt bolt Image" _builder_version="4.4.0"]

EQ6AltitudeAdjustmentBentBolt

[/et_pb_text][et_pb_text _builder_version="4.4.0" hover_enabled="0"]

If you haven't done it already also do the super smooth azimuth mod and the super smooth Altitude mod

[/et_pb_text][/et_pb_column][/et_pb_row][/et_pb_section]

Informal Evening 2020-02-27

[et_pb_section fb_built="1" _builder_version="4.3.4" global_colors_info="{}"][et_pb_row _builder_version="4.3.4" global_colors_info="{}"][et_pb_column type="4_4" _builder_version="4.3.4" global_colors_info="{}"][et_pb_text _builder_version="4.3.4" global_colors_info="{}"]

Another clear Thursday and an observing evening, below are a couple of images from the session.

[caption id="" align="aligncenter" width="800"]20200228_160818 Image by Jim of the Moon and Venus[/caption][caption id="" align="aligncenter" width="600"]Image by Leigh of the Flame Nebula and the Horsehead 
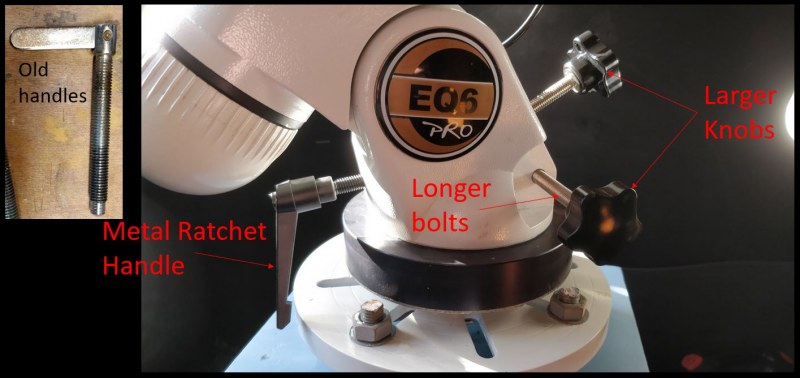
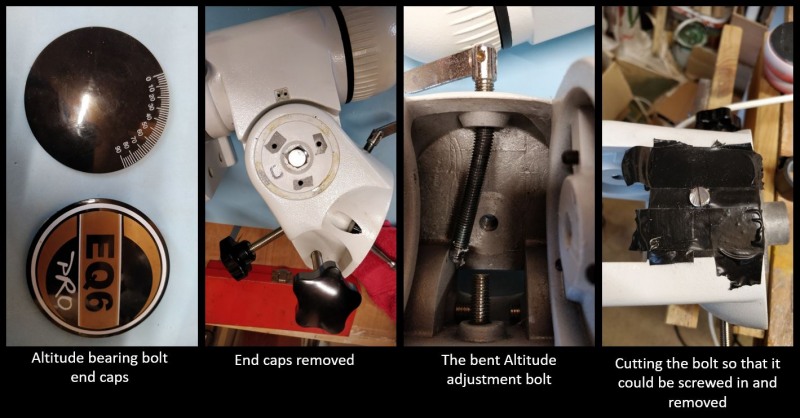
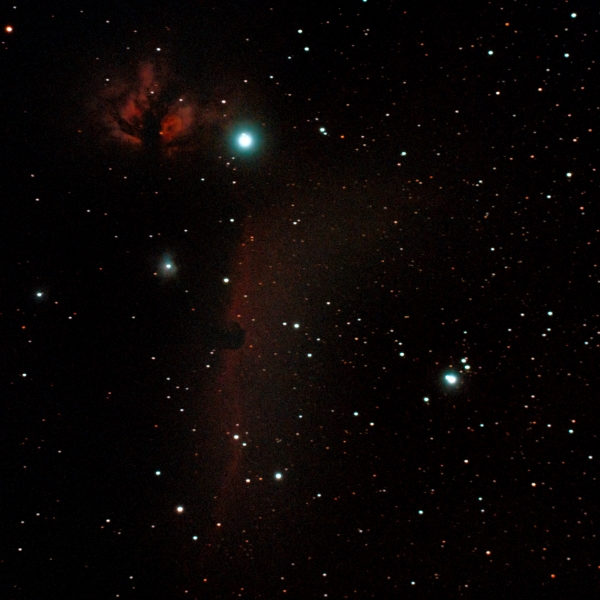
Image by Leigh of the Flame Nebula and the Horsehead Taken at Sutton-at-Hone[/caption]

[/et_pb_text][/et_pb_column][/et_pb_row][/et_pb_section]

TOP